Last updated $Date: 2008-10-03 07:47:15 $
Martti Kupar
inen <martti.kuparinen@iki
.fi>
http://www.iki.fi/kuparine/comp/vmware/esxichecklist.html
This is how I installed and configured all VMware ESXi hosts.
VMware, Inc. has a bare-metal hypervisor for AMD and Intel x86 CPUs called ESXi which is now available for free of charge. This document described how I installed and configured all our VMware ESXi hosts. Before trying to install ESXi on your host, make sure your hardware is compatible with ESXi (see also this list).
The following picture gives an overview of our VMware ESXi setup.

First modify/check your BIOS settings:
Next add a third NIC (1 GbE or 10 GbE) for the storage network (only if iSCSI or NFS is used).
Next fetch the latest VMware ESXi from www.vmware.com and burn it on a CD disk. Boot from the CD and install it. Do not connect any ethernet cables before the initial configuration is done.
If you just want to test ESXi first before installing it on real hardware, you can install VMware ESXi on a USB memory stick. The only restriction with that setup is that you must have external storage (iSCSI or NFS) for virtual machines, all the configuration tasks presented here are same as when you install ESXi on HDD.
Some basic things are configured on the Direct Console User Interface (DCUI) while most of the configuration is done with the VMware Infrastructure Client from your Microsoft Windows PC. This PC needs either be on the management network or have access to it via some router. Our administrators are normally using Ubuntu PCs so we have a Windows XP running inside VMware Player, in other words, this management host can be a virtual machine instead of a normal PC.
Select Configure Root Password from the main menu and set the root password.
Now connect ethernet cable to the management NIC. Next select Configure Management Network from the main menu. Select Network Adapters and select the only adapter which has a connection. Next select IP Configuration, select Set static IP address and network configuration and set the address, netmask and gateway. Next select DNS Configuration and define you DNS server's IP address(es). Next select Custom DNS Suffixes and add your local network name. Next select Restart Management Network from the main menu. Finally connect ethernet cable to the remaining interfaces.
Activate SSH on the ESXi by following the following instructions. Please note that you must properly secure the management network as this opens an additional way to access the ESXi host. Consider also allowing SSH only for non-root users in order to increase security.

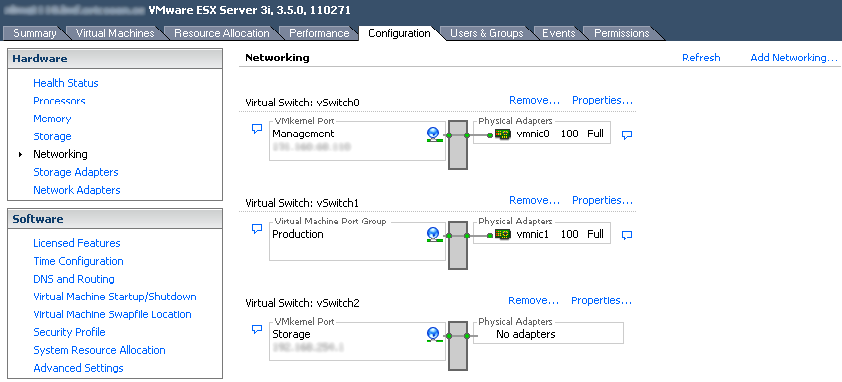
Configuration > Networking > Add Networking > Virtual Machine >
Create a virtual switch
Network Label = Production
VLAN ID = Empty
Configuration > Networking > vSwitch0 > Properties > VM Network > Remove
Configuration > Networking > Add Networking > VMkernel >
Create a virtual switch
Network Label = Storage
VLAN ID = Empty
IP Address: xxx.xxx.xxx.xxx
Netmask: 255.255.255.xxx
Configuration > Licensed Features > License Source > Edit > Use Serial Number
Configuration > Time Configuration > Properties > Options
NTP Settings > Add > esxgw.mycompany.com
General > Start automatically
Configuration > Advanced Settings > Syslog > Remote
Syslog.Remote.Hostname = esxgw.mycompany.com
Syslog.Remote.Port = 514
Configuration > System Resource Allocation > Advanced > host > vim > sfcb > Edit Settings > CPU Resources > Limit = 500 MHz
See also CPU spikes on a PowerEdge 850.
Configuration > Virtual Machine Startup/Shutdown > Properties > Allow virtual machines to start and stop automatically with the system
TBD
Configuration > Storage Adapters > iSCSI Software Adapter > Properties
General > Configure > Enabled
Dynamic Discovery > Add > iSCSI Server = xxx.xxx.xxx.xxx
Configuration > Storage > Network File System
Server = xxx.xxx.xxx.xxx
Folder = /some/path
Datastore Name = xxx
TBD: http://www.vm-help.com/esx/esx3i/change_name_and_cert.php
scp server.key esx1:/host/ssl_key
scp server.pem esx1:/host/ssl_cert
TBD
vicfg-cfgbackup -s --server myesx --username root myesx.bak
http://support.dell.com/support/edocs/software/eslvmwre/EN/VES_3i/Solutions Guide/PDF/MSGPA03.pdf
Appendix E
TBD
/etc/vmware/esx.conf
TBD
Fetch RCLI from the VMware Infrastructure 3 Drivers & Tools page. Extract and install it on your Linux desktop.
tar xzf /home/www/vmware/VMware-RCLI-3.5.0-104314.i386.tar.gz -C /tmp
cd /tmp/vmware-rcli-distrib
sudo ./vmware-install.pl
VMware ESXi, like any other host, needs maintenance from time to time. The VMware Update Manager is a simple Microsoft Windows application which makes it easy to push all the software updates available to your ESXi hosts. Another method is to use the vihostupdate utility from the RCLI package. See KB 1006089 and the vihostupdate(8) manual page for details how to use this utility.
In addition to installing VMware Update Manager or RCLI, you should sign-up for security notifications at VMware Security Center.
TBD
TBD
http://www.vmware.com/pdf/vi3_301_201_vm_backup.pdf
TBD
http://www.vmware.com/download/vi/drivers_tools.html
TBD
cd /vmfs/volumes/datastore1
ln -s /usr/lib/vmware/isoimages/linux.iso
ln -s /usr/lib/vmware/isoimages/windows.iso
ln -s /usr/lib/vmware/isoimages/freebsd.iso