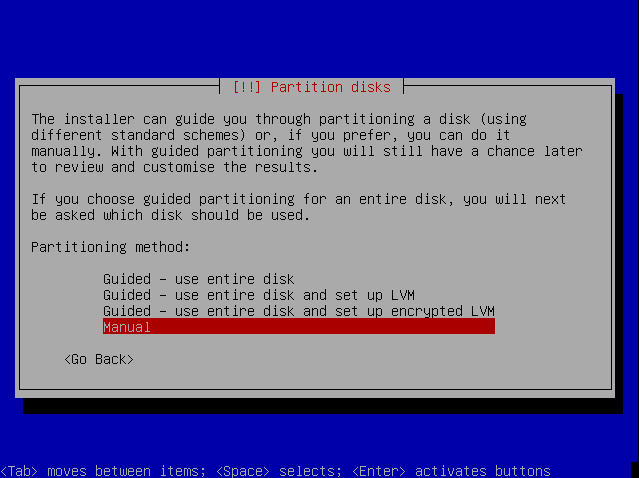
Picture 1 - Starting the disk partitioner
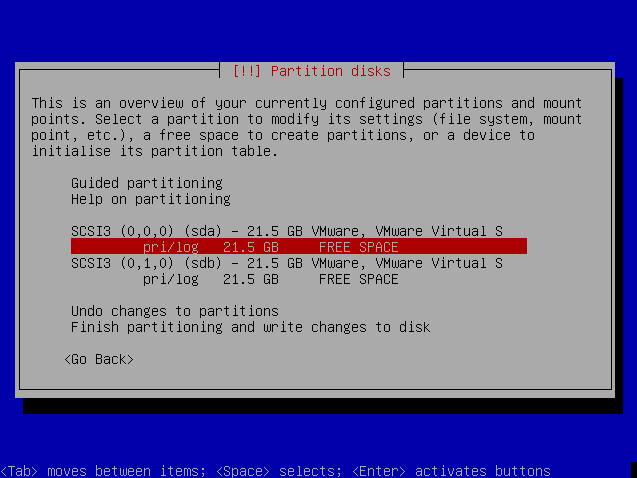
Picture 2 - Two empty disks
Last updated $Date: 2008-08-25 10:31:41 $
Martti Kuparinen <martti.kuparinen@iki.fi>
http://www.iki.fi/kuparine/comp/ubuntu/en/raid.html
This document describes how I installed my PC running Ubuntu 8.04. The PC has two identical SATA disks configured in RAID1 to protect me from a single disk failure. Even though I'm using RAID1 for everything I still make regular backups as RAID is not a replacement of a good backup system.
[ Please note that this page is also available in Finnish ]
I started installation with the "Alternate install CD" and I selected
"Manual" in the beginning of disk partitioning (picture 1).
I made sure both hard drives were found by the installer (picture 2 shows
two identical disks).
Next I removed all existing partitions (which were previously used by
Microsoft Windows). You can easily remove all partitions by pressing
Enter on top of the disk name (I pressed Enter on top of sda and sdb -- one
line above and below the red line in picture 2).
Picture 1 - Starting the disk partitioner
Picture 2 - Two empty disks
Next I created 3 partitions on both disks: 8 GB for /, 500 MB for swap
and the remaining space for /home. Please note that at this stage the
partition types must be "physical volume for RAID" (0xFD in fdisk) instead of
"Ext3 journaling file system". Also note how the first partitions of
both disks are marked bootable (the B flag in picture 4). Without setting
those partitions bootable you might not be able to boot your computer
without a CD!
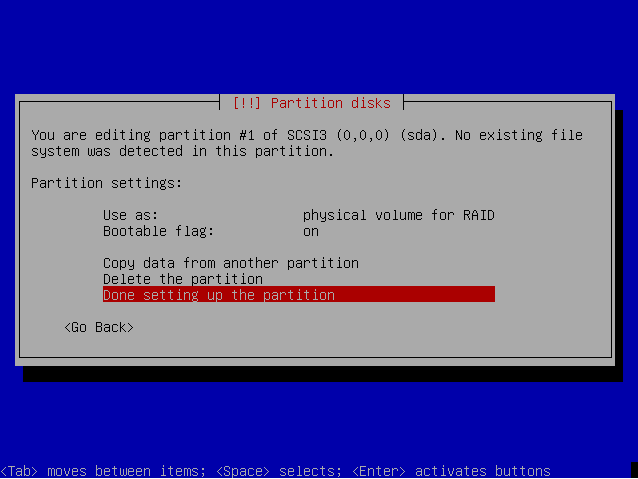
Picture 3 - Setting partition type and bootable flag
Next I went up and selected "Configure software RAID" (picture 4).
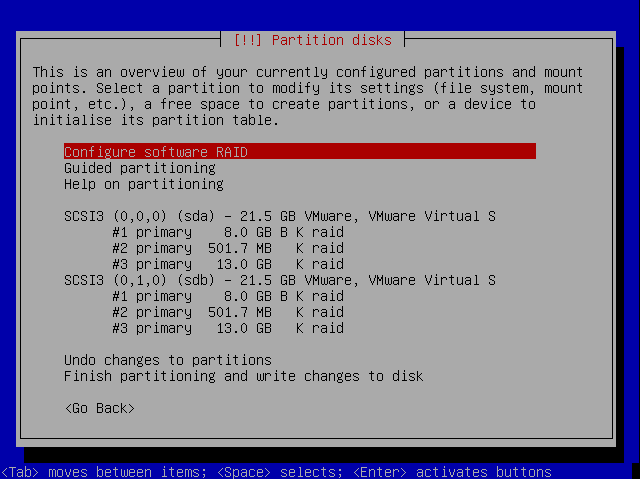
Picture 4 - Two disks with partitions for RAID1 volumes
Next I saved the modifications made to the partition tables (picture 5).
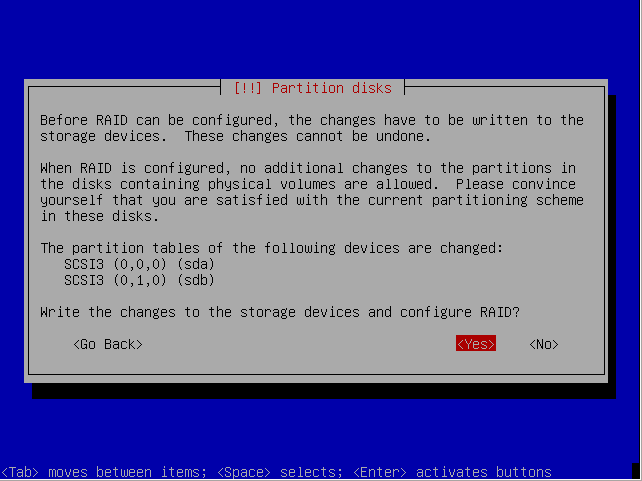
Picture 5 - Saving the changes
Next I created three (3) MD devices (each configured as RAID1
with 2 active and 0 hotspace disks -- pictures 6-9).
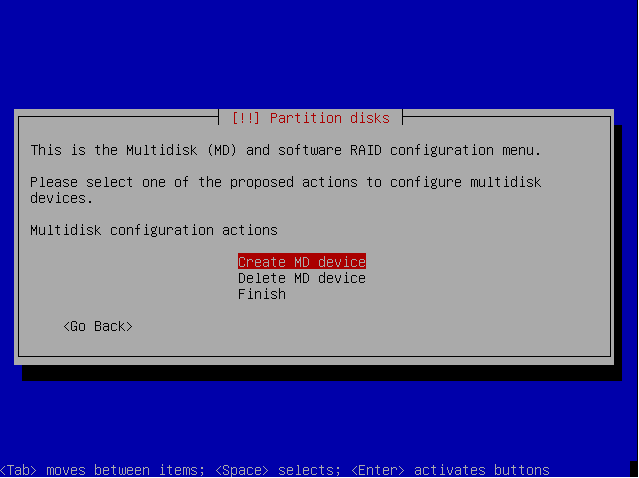
Picture 6 - Creating new MD devices
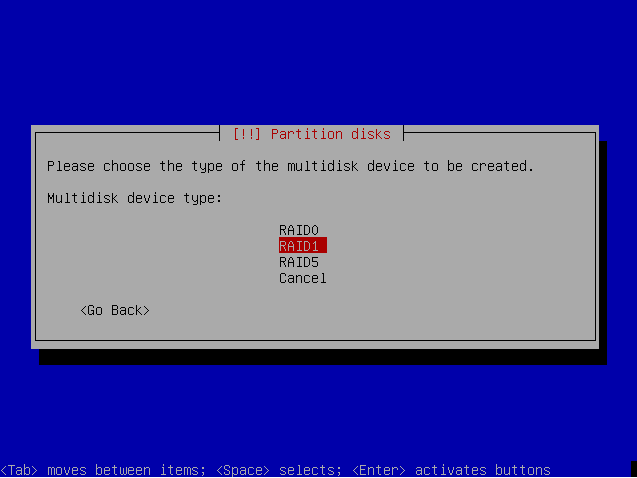
Picture 7 - RAID1 = mirror
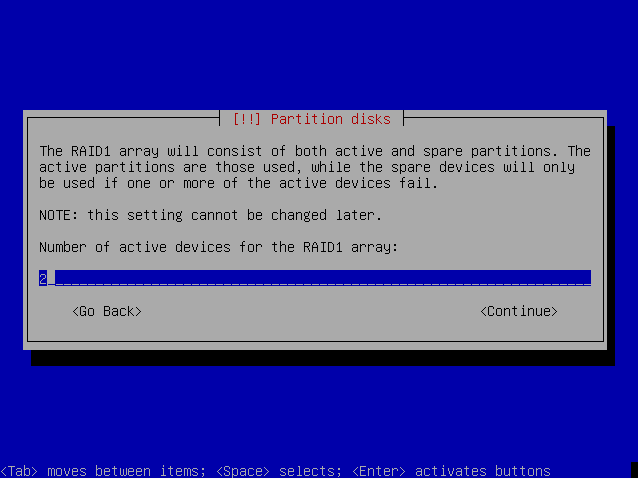
Picture 8 - Two active devices
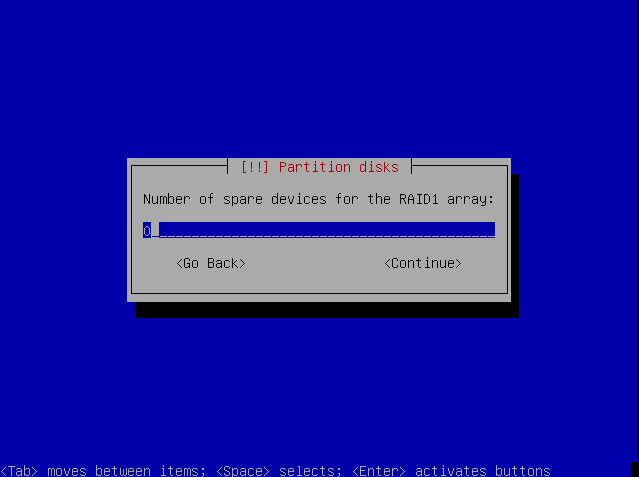
Picture 9 - No spare devices
Next I selected the physical disk partitions to be included in the RAID1 set
(picture 10). It's important to select two partitions with identical sizes
so in my case md0=sda1+sbd1, md1=sda2+sdb2 and md2=sda3+sdb3.
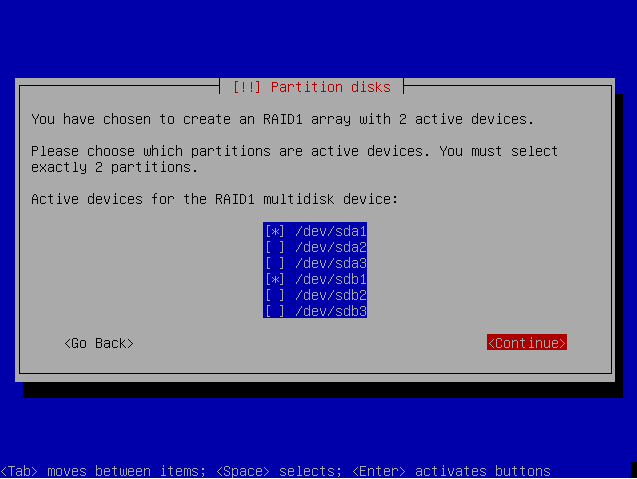
Picture 10 - Selecting MD components
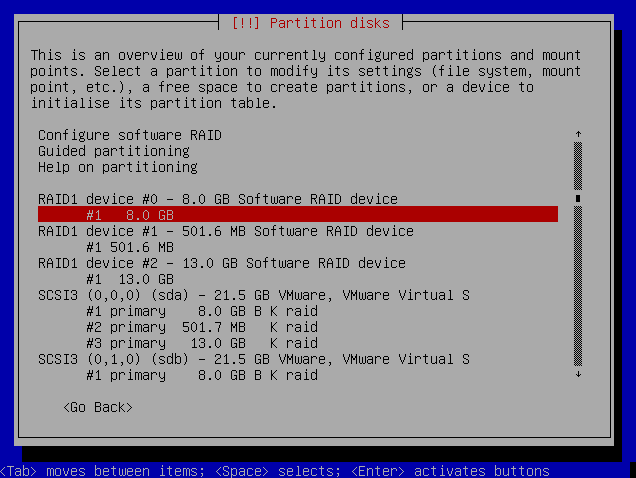
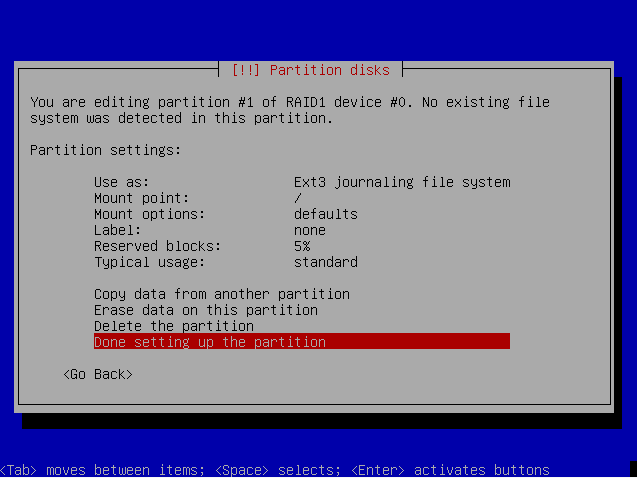
Next I configured file systems and mount points for each RAID device. In my
case "RAID device #0" is ext3 mounted on /, "RAID device #1" is swap and
"RAID device #2" is ext3 mounted on /home (pictures 11-15).
Picture 11 - File systems created on the RAID devices
Picture 12 - / filesystem created on the RAID device #0
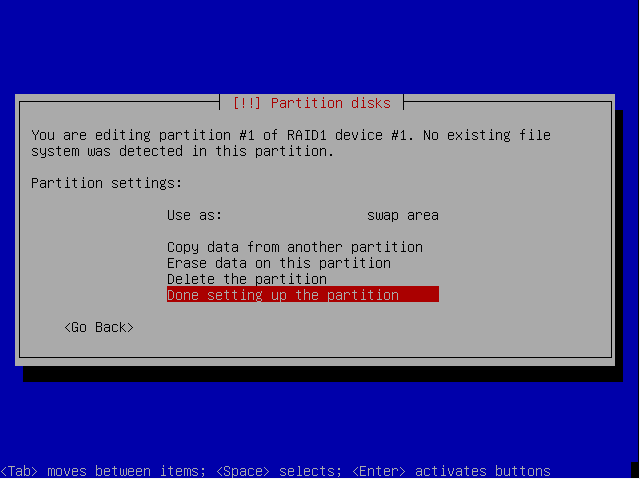
Picture 13 - swap created on the RAID device #1
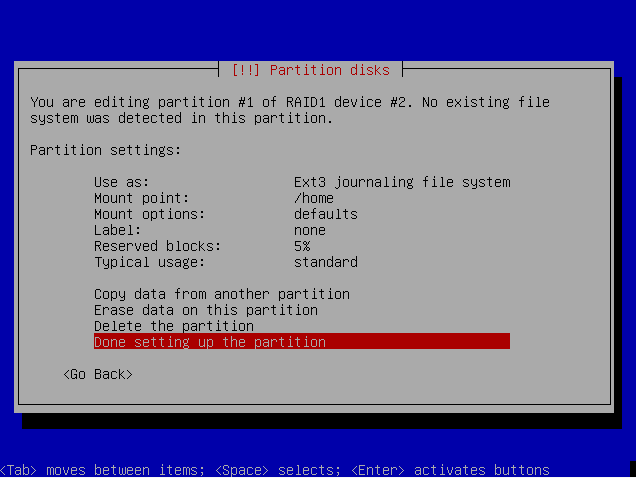
Picture 14 - /home filesystem created on the RAID device #2

Picture 15 - All file systems configured
Finally I went down and selected "Done setting up the partitions" and
selected "Yes" to write the changes made to the partition table (picture 16).
From this point on the Ubuntu installation is a normal installation.
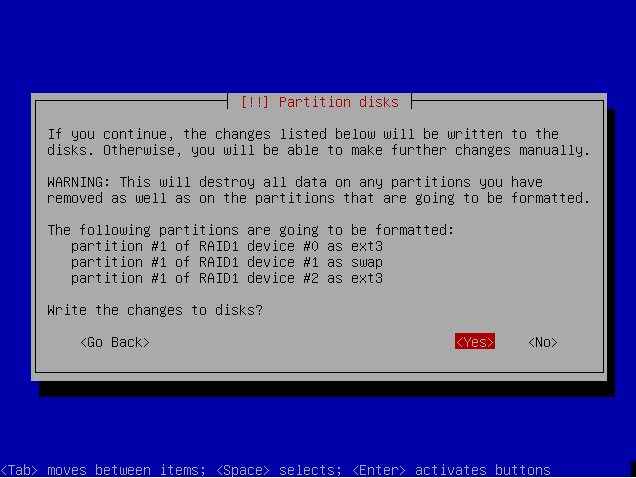
Picture 16 - Saving the changes
After installation and the first reboot I installed grub also on the second disk's (/dev/sdb) master boot record (MBR). Without this the PC will not start if the first disk (/dev/sda) fails and is removed from the PC.
martti@ubuntu:~$ sudo grub-install /dev/sda

martti@ubuntu:~$ sudo grub
grub> device (hd0) /dev/sdb
grub> root (hd0,0)
grub> setup (hd0)
grub> quit
WARNING: There is a serious bug which makes the boot fail if one of the physical disks in the RAID1 set is missing. The following patch helped me.
martti@ubuntu:~$ cd /tmp
martti@ubuntu:~$ wget http://www.iki.fi/kuparine/comp/ubuntu/en/local.diff
martti@ubuntu:~$ cd /usr/share/initramfs-tools/scripts
martti@ubuntu:~$ sudo patch -p0 < /tmp/local.diff
martti@ubuntu:~$ sudo update-initramfs -k all -u
Please note that you need to apply the patch every time the initramfs-tools package is upgraded or reinstalled.
After installation I verified that all file systems (/, swap and /home) are really on the RAID1 disks.
martti@ubuntu:~$ grep /dev/md /etc/fstab
/dev/md0        /               ext3    defaults,errors=remount-ro 0       1
/dev/md2        /home           ext3    defaults        0       2
/dev/md1        none            swap    sw              0       0

martti@ubuntu:~$ df -h / /home
Filesystem            Size  Used Avail Use% Mounted on
/dev/md0              7.4G  586M  6.4G   9% /
/dev/md2               12G  159M   12G   2% /home
The status of all RAID devices can be checked from the /proc/mdstat file. Each mdN device contains two sdXN disks and each mdN device should have "2/2" and "UU". More details can be seen with the mdadm utility.
martti@ubuntu:~$ cat /proc/mdstat
Personalities : [linear] [multipath] [raid0] [raid1] [raid6] [raid5] [raid4] [raid10]
md2 : active raid1 sda3[0] sdb3[1]
      12659136 blocks [2/2] [UU]

md1 : active raid1 sda2[0] sdb2[1]
      489856 blocks [2/2] [UU]

md0 : active raid1 sda1[0] sdb1[1]
      7815488 blocks [2/2] [UU]

unused devices: <none>

martti@ubuntu:~$ sudo mdadm --query --detail /dev/md0
/dev/md0:
        Version : 00.90.03
  Creation Time : Wed Oct 17 16:45:59 2007
     Raid Level : raid1
     Array Size : 7815488 (7.45 GiB 8.00 GB)
  Used Dev Size : 7815488 (7.45 GiB 8.00 GB)
   Raid Devices : 2
  Total Devices : 2
Preferred Minor : 0
    Persistence : Superblock is persistent

    Update Time : Wed Oct 17 15:16:18 2007
          State : active
 Active Devices : 2
Working Devices : 2
 Failed Devices : 0
  Spare Devices : 0

           UUID : 1760de71:d6ca4125:8324c8dc:300ec7e1
         Events : 0.11

    Number   Major   Minor   RaidDevice State
       0       8        1        0      active sync   /dev/sda1
       1       8       17        1      active sync   /dev/sdb1
Next I simulated a disk failure by disconnecting /dev/sdb. The system still boots but the status shows /dev/sdb1, /dev/sdb2 and /dev/sdb3 have disappeared from the system and how the /dev/mdN is marked as "degraded" in the status field.
martti@ubuntu:~$ cat /proc/mdstat
Personalities : [linear] [multipath] [raid0] [raid1] [raid6] [raid5] [raid4] [raid10]
md2 : active raid1 sda3[0]
      12659136 blocks [2/2] [U_]

md1 : active raid1 sda2[0]
      489856 blocks [2/2] [U_]

md0 : active raid1 sda1[0]
      7815488 blocks [2/2] [U_]

unused devices: <none>

martti@ubuntu:~$ sudo mdadm --query --detail /dev/md0
/dev/md0:
        Version : 00.90.03
  Creation Time : Wed Oct 17 16:45:59 2007
     Raid Level : raid1
     Array Size : 7815488 (7.45 GiB 8.00 GB)
  Used Dev Size : 7815488 (7.45 GiB 8.00 GB)
   Raid Devices : 2
  Total Devices : 1
Preferred Minor : 0
    Persistence : Superblock is persistent

    Update Time : Wed Oct 17 15:16:18 2007
          State : active, degraded
 Active Devices : 1
Working Devices : 1
 Failed Devices : 0
  Spare Devices : 0

           UUID : 1760de71:d6ca4125:8324c8dc:300ec7e1
         Events : 0.11

    Number   Major   Minor   RaidDevice State
       0       8        1        0      active sync   /dev/sda1
       1       0        0        -      removed
Next I reconnected the disk and instructed the system to rebuild itself. After rebuild everything was ok again.
martti@ubuntu:~$ sudo mdadm --add /dev/md0 /dev/sdb1
mdadm: hot added /dev/sdb1

martti@ubuntu:~$ sudo mdadm --add /dev/md1 /dev/sdb2
mdadm: hot added /dev/sdb2

martti@ubuntu:~$ sudo mdadm --add /dev/md2 /dev/sdb3
mdadm: hot added /dev/sdb3

martti@ubuntu:~$ cat /proc/mdstat
Personalities : [raid1]
md2 : active raid1 sdb3[2] sda3[0]
      12659136 blocks [2/1] [U_]
        resync=DELAYED

md1 : active raid1 sda2[0] sdb2[1]
      489856 blocks [2/2] [UU]

md0 : active raid1 sdb1[2] sda1[0]
      7815488 blocks [2/1] [U_]
      [>....................]  recovery =  2.8% (215168/7815488) finish=16.2min speed=9780K/sec

unused devices: <none>
That's it. Now go back to My Ubuntu Installation guide and see how to easily configure your newly installed system.